Search This Blog

Showing posts with label Apex. Show all posts

Monday, February 1, 2016

How to install Apex5 in windows and configure Oracle REST Data Services as web listener


Installing Apex5

Before installing apex 5 you should determine which Web listener you would like to use. Available options include the followings -
  • Oracle REST Data Services
  • Embedded PL/SQL Gateway
  • Oracle HTTP Server and mod_plsql
In all of these options Apex installation procedure is same and configuring Embedded PL/SQL Gateway is simpler. Embedded PL/SQL gateway provides the equivalent core features of Oracle HTTP Server and MOD_PLSQL. In this article I’ll install apex 5 and configure the Oracle REST Data Services with tomcat server. In this case I've used
  • Oracle Database 11gR2 (11.2.0) 64-bit
  • Oracle apex 5.0
  • Toad 12.8 64-bit
  • Windows 7 64-bit
  • Tomcat 9.0
N.B. I’ve discussed on Apex 4.2 installation with Embedded PL/SQL Gateway configuration here
Remember I’ll not discus about installing database. I assume that you have a database already installed and you have the administrative privileges on the database. Also assume that you have downloaded apex. If not so, you may get a copy of Oracle Apex 5.0 on OTN

Steps to install Oracle Apex 5

Step 1: Login to database and create a table space (e.g.TS_APEX). Table space creating command is as below
CREATE TABLESPACE ts_apex 
DATAFILE 'C:\APP\ADMINISTRATOR\ORADATA\CANOPAS\TS_APEX01.DBF' 
SIZE 2048M AUTOEXTEND ON NEXT 100M 
MAXSIZE UNLIMITED
LOGGING
ONLINE
PERMANENT
EXTENT MANAGEMENT LOCAL AUTOALLOCATE
BLOCKSIZE 8K
FLASHBACK ON;

Step 2: Unzip the apex folder. (Right click on apex_5.0.zip folder then choose extract here) you will find a folder named apex. Copy this folder anywhere on your hard drive you wish. In my case I’ve put it in H:\SoftWare\Apex\apex.

Step 3: Open Command Prompt (cmd). Change your working directory to apex where you put the unzipped apex folder (in my case it is H:\SoftWare\Apex\apex). Below images showing the command

Step 4: Now open SQL*Plus with nolog option by executing the command

 H:\SoftWare\Apex\apex> sqlplus /nolog
Then  
SQL> conn sys as sysdba
(To connect to database with sysdba privileges) When password require enter sys user’s password.

Step 5: Now you need to run apex installation file named apexins.sql. in command prompt enter the command like below

 SQL> @apexins.sql ts_apex ts_apex temp /i/

 [Here  
APEXINS.SQL is the apex main installation file.
TS_APEX is the table space name which we creates at first step for apex user,
temp is also a table space for apex temporary file.
/i/ is a virtual drive for images.
]
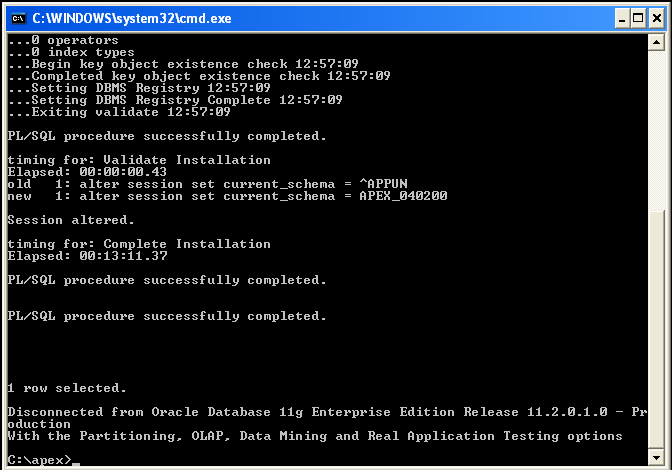
It may take 20/30 minutes and may be disconnect from database. Remember whenever you disconnect from database every time you must follow the step (3, 4) to connect again. When Oracle Application Express installed, it creates three new database accounts:
  • APEX_05000 - The account that owns the Oracle Application Express schema and metadata
  • FLOWS_FILES - The account that owns the Oracle Application Express uploaded files
  • APEX_PUBLIC_USER - The minimally privileged account used for Oracle
When installation is finished it shows message like flowing image
In a new installation of Oracle Application Express, you must change the password of the internal ADMIN account. To changes password connect to database again and run the flowing command

SQL> @apxchpwd

When prompted enter a password for the ADMIN account. It should be complex password like abcd#1234 Also you need to unlock APEX_PUBLIC_USER. To unlock account execute the following command
ALTER USER APEX_PUBLIC_USER ACCOUNT UNLOCK;

ALTER USER APEX_PUBLIC_USER IDENTIFIED BY new_password;

Configuring Restful Services

To configure oracle restful service connect to the database as sysdba and enter the following command

SQL> @apex_rest_config.sql
 
Enter a password for the APEX_LISTENER user              []
Enter a password for the APEX_REST_PUBLIC_USER user              []

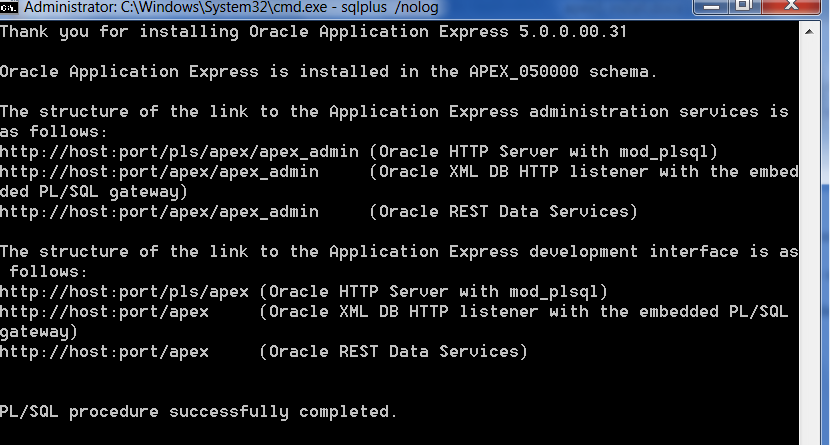
Installing and Configuring Oracle Rest Data Services

A. Download the file ” ords.version.number.zip” from the Oracle REST Data Services download page
B. Unzip the downloaded zip file into a directory (folder) of your choice. I put it in E:\ords.3.0.3.351.13.24. Actually there is nothing to install, that means your installation is done. Now you need to configure the Rest Data Service.

N.B.
B.I. By default, the context roots for accessing Oracle Application Express through Oracle REST Data Services is …/ords. If you wish to have a context root of … /apex for accessing Oracle Application Express, rename the file ords.war (E:\ords.3.0.3.351.13.24\ords.war) to apex.war before installing Oracle Rest Data Service. If you change the ords.war to apex.war then change the file ords_params.properties. Open the ords_params.properties file (location E:\ords.3.0.3.351.13.24\params) enter the line as it is here: rest.services.apex.add=true
 
B.II. Create a folder named config in the rest data service folder (E:\ords.3.0.3.351.13.24\config) to store rest data service configuration data. Later this location will be needed during configuration. Remember you can provide any location in your hard drive. To keep it in one place I've create this folder in ords.3.0.3.351.13.24 folder

C. following are the Installation/configuration options-
  • Simple Installation/configuration Using a Parameter File
  • Advanced Installation/configuration Using Command-Line Prompts
  • Manual Installation/configuration (If You Do Not Have SYSDBA Privileges)
We will Choose 'Advanced Installation/configuration Using Command-Line Prompts' from these options

Now open cmd and change your working directory to the directory or folder containing the ords.war file (in my case it is E:\ords.3.0.3.351.13.24). If you don't have rename ords.war to apex.war then enter the following command  

N.B. Before executing following command you need to install java.

E:\ords.3.0.3.351.13.24> java -jar ords.war install advanced

if you have rename ords.war to apex.war then enter the following command

E:\ords.3.0.3.351.13.24> java -jar apex.war install advanced

It will prompt you for some configuration information. Here I’ve showed the full prompt and what I selected.

This Oracle REST Data Services instance has not yet been configured. Please complete the following prompts

Enter the location to store configuration data:D:\Oracle\RestDataService\ords.3.0.3.351.13.24\config
Enter the name of the database server [localhost]:bh 
Enter the database listen port [1521]:
Enter 1 to specify the database service name, or 2 to specify the database SID [1]:2
Enter the database SID [xe]:erp
Enter 1 if you want to verify/install Oracle REST Data Services schema or 2 to skip this step [1]:
Enter the database password for ORDS_PUBLIC_USER:
Confirm password:
Please login with SYSDBA privileges to verify Oracle REST Data Services schema. Installation may be required.
Enter the username with SYSDBA privileges to verify the installation [SYS]:
Enter the database password for SYS:
Confirm password:
Enter 1 if you want to use PL/SQL Gateway or 2 to skip this step. If using Oracle Application Express or migrating from mod_plsql then you must enter 1 [1]:
Enter the PL/SQL Gateway database user name [APEX_PUBLIC_USER]:
Enter the database password for APEX_PUBLIC_USER:
Confirm password:
Enter 1 to specify passwords for Application Express RESTful Services database users (APEX_LISTENER, APEX_REST_PUBLIC_USER) or 2 to skip this step [1]:
Enter the database password for APEX_LISTENER:
Confirm password:
Enter the database password for APEX_REST_PUBLIC_USER:
Confirm password:
-------
---Installer upgradeORDS INFO: Completed upgrade for Oracle REST Data Services version 3.0.3.351.13.24. Elapsed time: 00:00:08.175

Enter 1 if you wish to start in standalone mode or 2 to exit [1]:2

D:\Oracle\RestDataService\ords.3.0.3.351.13.24>

Installing Apache Tomcat Application Server

To download tomcat go to tomcat site. From left side click on your desired version number. On the next page click on 32-bit/64-bit windows service installer it will download the tomcat .exe for windows. Now install tomcat by running downloaded (.exe) file

1. Deploying to Apache Tomcat

To configure Oracle Application Express Images on Apache Tomcat: Create a folder into /webapps (in my case it is E:\Tomcat 9.0\webapps) named i. Copy the contents from the /images folder (in my case it is H:\SoftWare\Apex\apex\images) to /webapps/i/.

Installing the Apache Tomcat Deployment

Move the ords.war or apex.war file from rest data service into tomcat’s webapps folder (/webapps) folder where Apache Tomcat is installed Access Oracle Application Express by typing the following URL in your web browser: 
http://hostname:port/ords/ or 
http://hostname:port/apex/ 


Removing Oracle Application Express from the Database

  1. Change your working directory to the apex directory where you unzipped the Oracle Application Express software.
  2. Start SQL*Plus and connect to the database where Oracle Application Express is installed as SYS specifying the SYSDBA role:sqlplus /nolog

    SQL> CONNECT SYS as SYSDBA
    Enter password: SYS_password

  3. Execute the following command:
    SQL> @apxremov.sql 
    
  4. After successfully removing Application Express using apxremov.sql, you must exit your current SQL*Plus session and reconnect before attempting another install using apexins.sql.


Friday, September 26, 2014

How to install Oracle Apex4 on Windows: A step by step description

Installing Oracle Apex on Windows

How you install Oracle Application Express depends upon which HTTP server you Decide to use. There are three options

  • 1: Oracle Application Express Listener
  • 2: Embedded PL/SQL Gateway
  • 3: Oracle HTTP Server

In all of these options Apex installation procedure is same and configuring Embedded PL/SQL Gateway is simpler. Embedded PL/SQL gateway provides the equivalent core features of Oracle HTTP Server and MOD_PLSQL.

In this article I’ll show how to install apex and configure the Embedded PL/SQL Gateway. In this case I've used

  • Oracle Database 11gR2 (11.2.0)
  • Oracle apex 4.2.5
  • Toad 10.5
  • Windows 7
If you want to configure oracle rest data service with tomcat read this article How to install Apex5 in windows and configure Oracle REST Data Services as web listener
Remember I’ll not discus about installing database.I assume that you have a database already installed and you have the administrative privileges on the database. Also assume that you have downloaded apex. If not so, you may get a copy of Oracle Apex 4.2.5 on OTN

Steps to install Oracle Apex

Step 1

Login to database and create a table space (e.g.TS_APEX). Table space creating command is as below

CREATE TABLESPACE ts_apex
DATAFILE 'C:\APP\ADMINISTRATOR\ORADATA\CANOPAS\TS_APEX01.DBF'
SIZE 2048M AUTOEXTEND ON NEXT 100M
MAXSIZE UNLIMITED
LOGGING
ONLINE
PERMANENT
EXTENT MANAGEMENT LOCAL AUTOALLOCATE
BLOCKSIZE 8K
FLASHBACK ON;

Step 2

Unzip the apex folder. (Right click on apex_4.2.5.zip folder then choose extract here) you will find a folder named apex. Copy this folder anywhere on your hard drive you wish. In my case I’ve put it in C:\apex.

Step 3

Open Command Prompt (cmd). Change your working directory to apex where you put the unzipped apex folder (in my case it is C:\apex). Below images showing the command

Step 4

Now open SQL*Plus with nolog option by executing the command

C:\apex> sqlplus /nolog ENTER

Then

SQL> conn sys as sysdba ENTER

(To connect to database with sysdba privileges)

When password require enter sys user’s password. ENTER

Step 5

Now you need to run apex installation file named apexins.sql. in command prompt enter the command like below

SQL> @apexins.sql ts_apex ts_apex temp /i/ ENTER

[ Here APEXINS.SQL is the apex main installation file. TS_APEX is the table space name which we creates at first step for apex user, apex files and temp is also a table space for apex temporary file. /i/ is a virtual drive for images. ]

It may take 30/40 minutes and may be disconnect from database. Remember whenever you disconnect from database every time you must follow the step (3, 4) to connect again.

When Oracle Application Express installs, it creates three new database accounts:

  • • APEX_040100 - The account that owns the Oracle Application Express schema and metadata.
  • • FLOWS_FILES - The account that owns the Oracle Application Express uploaded files.
  • • APEX_PUBLIC_USER - The minimally privileged account used for Oracle

When installation is finished it shows message like flowing image


In a new installation of Oracle Application Express, you must change the password of the internal ADMIN account. To changes password connect to database again and run the flowing command

SQL> @apxchpwd

When prompted enter a password for the ADMIN account. It should be complex password like abcd#1234

Also you need to unlock APEX_PUBLIC_USER. To unlock account execute the following command

ALTER USER APEX_PUBLIC_USER ACCOUNT UNLOCK;

ALTER USER APEX_PUBLIC_USER IDENTIFIED BY new_password;

Configuring the embedded PL/SQL gateway

To Configuring the embedded PL/SQL gateway run apex_epg_config.sql passing the file system path to the base directory where the Oracle Application Express software was copied after unzipped as shown in the following example:

SQL> @apex_epg_config system_drive:\temp

In my case it is SQL> @apex_epg_config C:\

Then, you need to unlock the ANONYMOUS account.

ALTER USER ANONYMOUS ACCOUNT UNLOCK;

Enable Oracle XML DB HTTP server:

SQL> exec dbms_xdb.sethttpport(8080);

SQL> commit;

to make sure the port is set to 8080 run the following statement

select all DBMS_XDB.GETHTTPPORT() from dual

You could also check the following statement

select all t.status from dba_registry t where ( ( t.comp_id = 'APEX' )) expect VALID;

Unlock some users which are related to apex (anonymous, apex_030200, apex_040100, apex_public_user

How to Uninstall Oracle Application Express

Open Command Prompt. change your working directory to the apex folder where it was installed then connect to the database

sqlplus /nolog press enter

conn sys@xe as sysdba

here XE is database name.

SQL>@apxremov.sql

After completed the process Remove the apex folder from the drive

Browse Apex from Your PC

Open a browser (firefox/Explorer etc). Write the URL: http://host:port/apex (eg: http://blackhorse:8080/apex)
Your default workspace is- internal
user name is- admin
password is- admin user password which you changed at step 5

I hope it will help you to understand how to install and uninstall oracle application express

If you have any query\comment please leave it in comment box. I'll be very pleased to reply you. Thank you.