Search This Blog

Monday, March 23, 2015

How to create a single or multiple local web host domain name using XAMPP running on Windows

Creating multiple local web host domain name with XAMPP running

Are you thinking to run your web site from your home pc using a custom domain (fake domain) name (eg. www.your-domain-name.com) instead of XAMPP ’s default URL like (http://localhost/my-site or something like that) or want to run multiple web sites from your home pc?

First of all I assure you that it is possible and quite easy. I assume you have installed XAMPP. Installing XAMPP allows you to develop, test, and play around with web server code on your local machine. You can configure and test out your website locally, instead of live somewhere on the web.

In my case, I've used

  • XAMPP 3.2.1
  • windows 7 64 bits
  • Firefox 32.0.2
  • I've installed XAMPP in E:\Installed\Xamp location.

By default XAMPP run your site from a default directory named htdocs. But you can changes this behavior of XAMPP by configuring Apache Server in XAMPP and windows hosts file.

This is a two step process: first, you have to redirect the web site name to your computer; next, you get Apache to redirect the web site address to a specific directory of your choice.

You may know that when we type a web site name into the URL field (eg. www.google.com), our browser sends the name to a Domain Name Server which actually convert the text name to ip address eg. www.google.com to10.11.201.71 (for example) then connects to IP address 10.11.201.71. Before doing that, it first checks a file called hosts on your computer. If the requested web site name is found, it uses the IP address found in the file. So first we will tell our browser to get our own (local) ip by changing the file host file. This file location is C:\Windows\System32\drivers\etc

Step 1. Configuring the windows’ hosts file

Open the file in any text editor. Go to the bottom of the file. You will find something like below image

Add your custom domain name below these line as in the below image. You can add as many domain names as you wish. See all are the same IP address

Now save the file. Step 1 is done.

Step 2: configuring apache server’s virtual host file

Locate the “httpd-vhosts.conf” virtual host file. File location is in your XAMPP installation drive(c):\XAMPP \apache\conf\extra (in my case it is E:\Installed\Xamp\apache\conf\extra)
Open the file in a text editor and at the bottom of the file add this code by changing ServerName, ServerAlias,DocumentRoot as your needs.

<VirtualHost *:80>
     ServerName  www.local.hiracave.com
     ServerAlias hiracave.com
     DocumentRoot E:/Installed/Xamp/htdocs/hiracave

     <Directory "E:/Installed/Xamp/htdocs/hiracave">
        Order allow,deny
        Allow from all
     </Directory>
</VirtualHost>

Remember if you have more than one site you need multiple copy of the code. See the bellow image for two website www.local.hiracave.com & www.canopas.com; I’ve added two piece of the code.

Windows virtual host file

ServerName:

following this label, add the name of the domain you added in windows hosts file.

ServerAlias:

following this label, you may add the name without “www.” So that you can access your site using www.yoursite.com or only yoursite.com

DocumentRoot:

following this label, add the path where your website is located.

Directory:

This portion actually granting permission to access the directory you using. Otherwise you may encounter an ERROR 403

Save the file.

Restart the Apache Server to have the change take effect. Do this by clicking on the Stop button on the XAMPP control panel and then clicking on the Start button.

You are done. Now access your site using your domain name which you have setup just now. Your URL is www.your-domain-name.com. In my case it is www.local.hiracave.com and www.canopas.com also I can access my site using local.hiracave.com and canopas.com

Thank You…

I hope it will help you to understand how to create a single or multiple local web host domain name using XAMPP
If you have any query\comment please leave it in comment box. I'll be very pleased to reply you. Thank you.


Thursday, March 19, 2015

How to query/fetch data of MS Access DB from an Oracle DB?


To day I'll show you how we can read/query data which is in MS Access database from oracle database. it is a step by step description and I assume that you have a oracle database and MS access database. So I'll not discuss of this two database installation or configuration. For this tutorial I've used
  • Oracle database 11g version 11.2.0.1.0
  • Windows XP SP-3
  • MS Access 2007

Steps to complete the tutorial:
  • Step1: Creating System DSN (Data Source Name) with Microsoft Access Driver
  • Step2: Configuring Oracle Net Listener-listener.ora file
  • Step3: Configuring oracle heterogeneous services 11g HS (initaccessdb.ora)
  • Step4: Configuring Oracle Local Naming file - tnsnames.ora
  • Step5: Creating DB Link in Oracle and accessing data from MS Access database

Step 1: Creating System DSN (Data Source Name) with Microsoft Access Driver

First go to ODBC Data Source Administrator. For this follow the step below:
Go to Start>Programs>Oracle-Oradb11g_home1 (in my case it is home2)>Configuration and Migration Tools> Microsoft ODBC Administrator


In WINDOWS 10 you may not find the Configuration and Migration Tools in start menu. In this case you can open it from control panel> administrative tools>ODBC Data Sources (32-bit)/ODBC Data Sources (64-bit). Remember if your access database is 32 bit then open ODBC Data Sources (32-bit), if it is 64 bit then open ODBC Data Sources (64-bit)


It will open Microsoft ODBC Administrator console

Click on System DSN tab then Click Add button. Select Microsoft Access Driver (*.mdb,*.accdb) then click finish.

Some times you may not find Microsoft Access Driver like above image, specially in widows 7, as bellow image showing blank driver list.


 In this case open odbc driver from following location: C:\Windows\SysWOW64\odbcad32


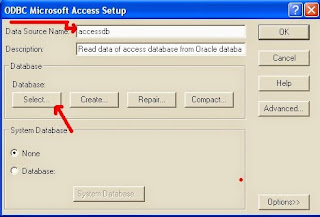
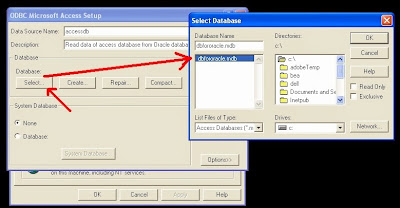
It will open the following window. In this window give a data source name. In my case I’ve given the name accessdb. Please remember or note down the data source name. Provide a description, description is not mandatory. Click on select button to select your MS Access database (.mdb or .accdb file).


Then choose your access database file


then click OK> OK> OK it will Save the configuration.

Step 2: Configuring Oracle Net Listener-listener.ora file

Let's locate the file; it is in database home/network/admin directory. In my case: it is
D:\oracle\app\product\11.2.0\dbhome_1\NETWORK\ADMIN  

Note: if you do not find any listener.ora file simply create a file named listener.ora and add the following entry Listener.ora file


   LISTENER =
     (DESCRIPTION_LIST =
    (DESCRIPTION =
      (ADDRESS_LIST =
     (ADDRESS = (PROTOCOL = TCP)(HOST = 10.11.201.76)(PORT = 1521)) 
      )
    )
     )

   SID_LIST_LISTENER=
    (SID_LIST =
     (SID_DESC =
      (SID_NAME = accessdb)
      (ORACLE_HOME = D:\oracle\app\product\11.2.0\dbhome_1)
      (PROGRAM = dg4odbc)
     )
   )
  
In first block:
• HOST: the host name is your computer, where database is resides, name or IP address.
In second block:
• SID_NAME: is the name of access DSN Which we create at step 1 in this case it is 'accessdb'
• ORACLE_HOME: oracle database home directory path
• PROGRAM = dg4odbc (leave it as it is)

Step 3: Configuring oracle heterogeneous services 11g HS (initaccessdb.ora)

Go to heterogeneous service directory in oracle database_home/hs/admin in my case it is  
D:\oracle\app\product\11.2.0\dbhome_1\hs\admin

There you will find a file named 'initdg4odbc.ora'. make a copy of this file and rename it as initaccessdb.ora and Add the following text to the file:
HS_FDS_CONNECT_INFO = accessdb
HS_FDS_TRACE_LEVEL = 0

Note: the file name should be init then your access DSN name and extension is .ora.
HS_FDS_CONNECT_INFO: Here we write the name of the DSN created in the ODBC source tool in the first step, so it's 'accessdb'

Step 4: Configuring Oracle Local Naming file - tnsnames.ora

TNS file location is D:\oracle\app\product\11.2.0\dbhome_1\NETWORK\ADMIN in the tnsnames.ora file make an entry like bellow
  accessdb =
  (DESCRIPTION =
  (ADDRESS = (PROTOCOL = TCP)(HOST = 10.11.201.76) (PORT = 1521))
  (CONNECT_DATA =
    (SID = accessdb)
  )
  (HS=OK)
  )
  
Here
HOST: Name or IP address of the database server
SID: This is the name of the access DSN name in this case it is accessdb 
 HS=OK: it is a mandatory entry so leave it as it is.

At this point we need to restart oracle database listener service. To do so, Open a command line terminal change your working directory to: Database home/BIN (D:\oracle\app\product\11.2.0\dbhome_1\BIN )

To stop the listener
D: \oracle\app\product\11.2.0\dbhome_1\BIN >LSNRCTL.EXE stop 

To start  listener
D: \oracle\app\product\11.2.0\dbhome_1\BIN >LSNRCTL.EXE start

Alternatively in windows run write services.msc and press enter then find the oracle listener service and right click on the service name (OracleOraDb11g_home1TNSLinstener) then choose restart.

Step 5: Creating DB Link in Oracle and accessing data from MS Access database

You need to create a database link(DBLink) in your oracle database. Create DB Link command
CREATE public DATABASE LINK accessdblink USING 'accessdb';

Note: Here accessdblink is the name of link we creating and accessdb is the name of access DSN

Query the database:
Select * from empmas@accessdblink;


Last Update: Tuesday 27 March, 2018

Previous Update:Wednesday 02 August, 2017